Photo Scanning Tip: How To Fix Faded Dull Colours Using FREE Image Editing Software, GIMP

Are You Getting Dull Looking Photo Scans? Here's How To Fix Faded Colours In GIMP...
Read these free tips, and you'll learn...
- Two easy step on how to fix photo scan colours in GIMP
- To make colours look more natural, vibrant, and less flat
- Once you understand how to fix colours, the rest of the scans will go faster
- You can do this with free editing software, GIMP... Download GIMP here
Ready? Let's go!
Once You Get Why Your Scans Look Flat, The Rest Will Be Easy
There's two things messing up your photo scan.
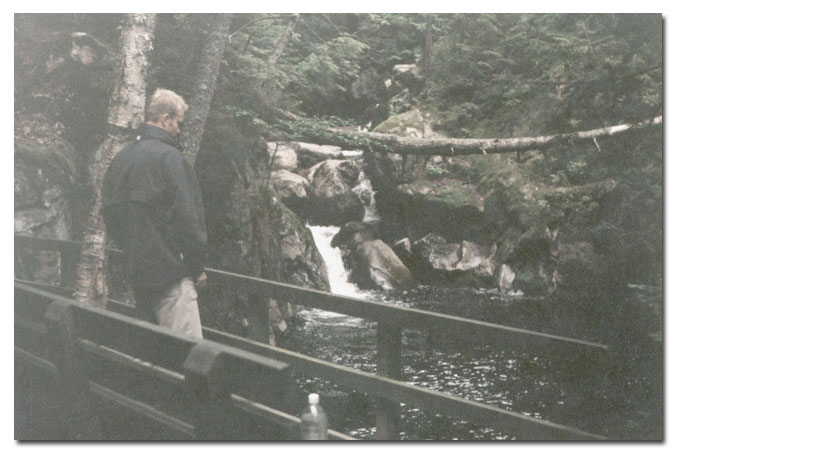
Problem one... "colour cast". You get colour casting because your scanner will also scan the light/glare coming off your physical photo.

Above: The number one reason why colours look dull and flat is because your scanner also picks-up gloss.
Problem two... is because of time. The longer your photos have sat in your closet, the less vibrant the colours will be.
Here's how to fix these two issues.
1. Remove The Glare (Colour Cast)
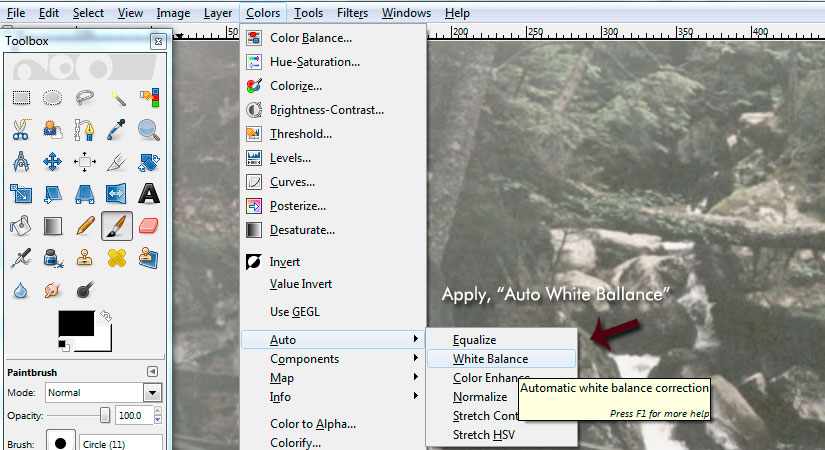
No matter how new or old your photo is, your scanner will also scan the gloss coming off your photo. To get rid of this without touching any of the real colours of your image, do the following command:
- GIMP > Colors > Auto > White Balance

Above: Get rid of the glare that your scanner picked up during the scan by using White Balance tool.
That is it! GIMP makes it easy without having to mess around with RBG levels.
Next...
2. Bring Back The Original Colour
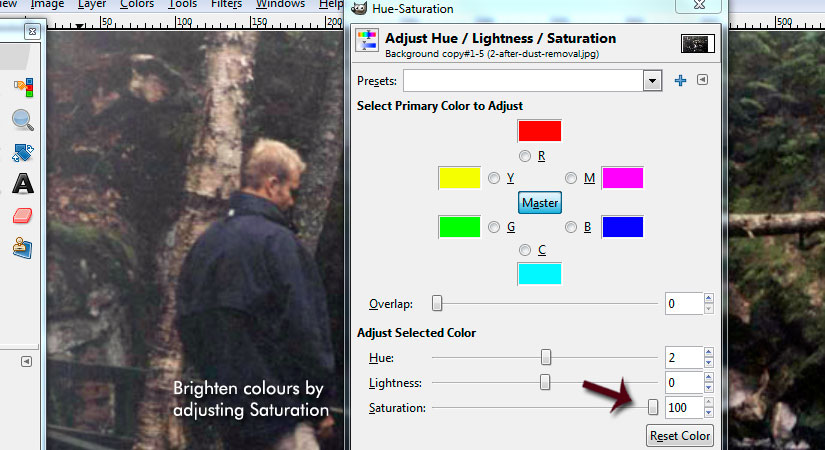
Once colour cast is fixed, now you can brighten up faded colours. The command is:
- GIMP > Colors > Hue and Saturation
And you will get a pop up like this...

Above: Hue and Saturation Tool will help you brighten your colours back to their original luster.
Move the Saturation slider to the right. I went to 100, but adjust yours accordingly.
That's it for colour fix!
Table Of Contents: How To Edit Photo Scans Using GIMP
Free Ebook: Tells You Secrets To Getting High Quality Slide, Negative, Photos Scans In Half The Time
Which of these scanning troubles do you want to overcome?
- What's the best resolution / DPI to scan your slides, negatives, and photos -- so you don't lose details
- Best method to digitize slides, negatives, photos using your regular flatbed or film scanner
- How to clean your negatives, slides, and photos before you scan them -- so you don't scratch them
- What side should you scan a slide or negative -- so they're not backwards or facing the wrong way
- How to setup your scanner to get higher quality digital images -- 24bit JPEG? 48bit TIFF?
- How to fix your digital images using Digital ICE, GIMP, or Photoshop and make them look new
- How to improve your scan workflow so you can double your productivity and finish your project twice as fast
- Understand the technical stuff of a digital image so you can make sideshow videos, reprints, and more!
Hey, my name is Konrad. I've been scanning professionally since 2005. I've helped multi-billion dollar companies, pro sports teams, pro photographers, artists, museums, book publishers, etc. I've scanned over 930,000 slides, negatives, photos.
The reason I'm telling you this is because no matter what challenge or frustration you're having, I know exactly what you're going through. So, to help you RIGHT NOW, I've put together a super simple scanning guide to get you started.
