Discover How To Fix Your Photo Scans Professionally Using Photoshop
In this photo scanning guide, you're going to learn how to...
- Make your image colours look natural and less dull and flat
- Get rid of dust scratches without taking away detail
- Make blurry photos look sharper and more defined
But if you're not sure what the actual problems are when scanning photos, then how are you suppose to fix them?
So here's the 3 problems and how to fix them...
Problem 1: Your Photo Scans Are Going To Look Unnatural
Take out a photo. Look closely. Do you see a shine or gloss coming off the surface? Even old photos made out of thicker paper have some light coming off the surface.
Why am I talking about the surface of your photo?
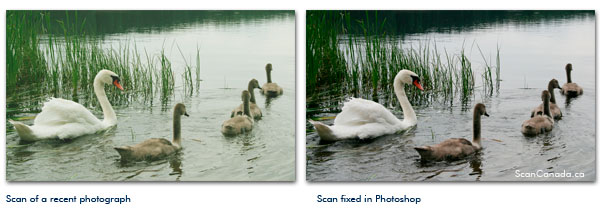
Well, your scanner is ALSO going to scan the light coming off the surface of your photos. And you'll get images like this...

It doesn't matter if your photo is 100 years old. Or if your photo is 1 year old. The light coming off the surface of your photos is going to blunt, flatten, and dull the colours of your scan.
Click the link below to fix this...
How To Fix Colour From A Photo Scan Using PhotoshopProblem 2: Dust, Scratches, Cracks, Folds In Photos
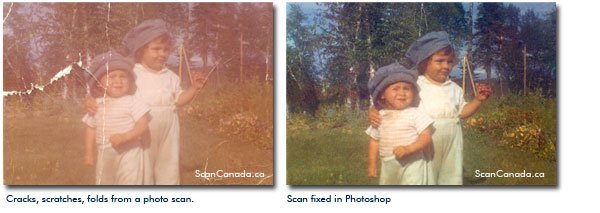
If you're family is like mine, then your mom probably stuffed all the photos in a box and hid it in a closet. All to save space.
But now the photos are bent. Or scratched because they've been moved around so much.
In this section, I'm going to show you to do this...

Click here for a step-by-step guide...
How To Fix Cracks From A Photo Scan Using PhotoshopProblem 3: Photos Don't Look Sharp Or Well Defined
Another problem is sometimes photo scans look blurry or out of focus. Have a look...

This can be because the photo was taken out of focus. And sometimes it's because the actual paper of the photo will dull the details.
To fix the sharpness of a photo, click here...
How To Fix Sharpness Of Photo Scan Using Photoshop3 Action Steps On How To Fix Your Photo Scans Using Photoshop
Here's those full tutorials again...
Step 1: How To Fix Colour From A Photo Scan Using Photoshop
Free Ebook: Tells You Secrets To Getting High Quality Slide, Negative, Photos Scans In Half The Time
Which of these scanning troubles do you want to overcome?
- What's the best resolution / DPI to scan your slides, negatives, and photos -- so you don't lose details
- Best method to digitize slides, negatives, photos using your regular flatbed or film scanner
- How to clean your negatives, slides, and photos before you scan them -- so you don't scratch them
- What side should you scan a slide or negative -- so they're not backwards or facing the wrong way
- How to setup your scanner to get higher quality digital images -- 24bit JPEG? 48bit TIFF?
- How to fix your digital images using Digital ICE, GIMP, or Photoshop and make them look new
- How to improve your scan workflow so you can double your productivity and finish your project twice as fast
- Understand the technical stuff of a digital image so you can make sideshow videos, reprints, and more!
Hey, my name is Konrad. I've been scanning professionally since 2005. I've helped multi-billion dollar companies, pro sports teams, pro photographers, artists, museums, book publishers, etc. I've scanned over 930,000 slides, negatives, photos.
The reason I'm telling you this is because no matter what challenge or frustration you're having, I know exactly what you're going through. So, to help you RIGHT NOW, I've put together a super simple scanning guide to get you started.
