What You're Really Paying For When Buying A Negative Film Scanner
Let's compare a $3000 scanner vs. a $200 scanner, and see what we get...
Are you curious to see the difference between a $200 flat-bed scanner vs. a $3000 high-end film scanner?
Read this article and you'll see why the scanner you already have is good enough. And if you are looking to buy a negative film scanner, I'll show you why you the real reason you'll pay extra for a more expensive scanner.
Here's what you need to know...
1. You're Not Paying Extra For Scanner Hardware

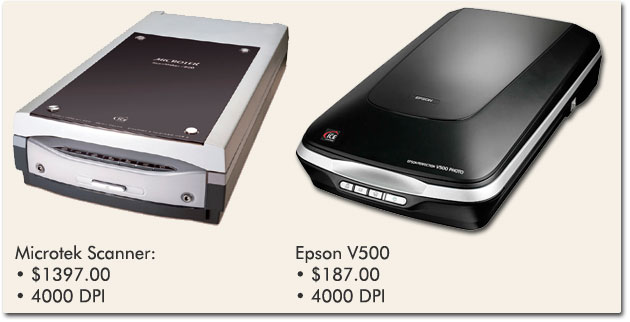
The first misconception is that a more expensive scanner will have more high-tech hardware. Maybe. But back in 2005 I bought a Microtek scanner for almost $1400. It was the best during it's time. Now, I can get an Epson V500 for $180 -- that has the SAME hardware specs as the Microtek.
The reason is simple: today's scanner technology is amazing. A regular, $200 flat-bed scanner can give you an 18 mega pixel, 4000 DPI negative scan.
So, if the hardware specs are the same, what the heck are you paying for?
2. What Are You Really Paying For

Did you ever notice the Digital ICE logo on most scanners? Digital ICE and other scanner enhancement software is designed to help you remove dust, scratches and fix faded colours.
Now, Kodak owns Digital ICE. And it licenses this application to scanner manufactures. So if you buy a $200 scanner, you're most likely getting the basic version of Digital ICE. If you paid more, then you probably have the more advanced version.
That's what you're paying for. It's not the hardware. And scanner manufactures know this. They know their hardware does exactly the same thing as the next guy. So to get your attention, the scanner manufacturer will add bells and whistles like Digital ICE, ROC, Dust Removal, etc.
3. Is It Worth Paying Extra For A Better Version Of Digital ICE?
Now you know that you're not really paying for hardware, but for the software. Is the extra cost for better software worth it?
I have nothing against Digital ICE or other scanner software that help you fix your scans. They do help speed up the scanning processes. And it's very easy to use (press a couple buttons, and you're set).
But with most things, what you pay in speed you'll pay in quality.
Here's what I suggest: if your focus is on speed, than pay a little extra for a better version of Digital ICE. You won't get the best quality negative scans with Digital ICE. But you will get them done faster.
But if you have the time, and quality is more important to you than speed, I'd suggest NOT to use Digital ICE. Use your scanner for what is is mean to do: scan. Then use software designed to fix digital images.
And if you're not a graphic designer, and are afraid of image editing software... don't worry, I'll show you, step-by-step how to fix your scans and get better quality digital images.
4. Let's See The Difference Between A $200 Scanner And A $3000 Scanner
Here's a negative scan of the same images. On the left I used my Epson V500 ($200). On the right I used my Nikon film scanner ($3000).
For both scans I DID NOT use Digital ICE. I want to compare pixel quality, not colour quality.
Now, let's zoom in and compare them at the pixel level...
At the pixel level the Nikon is sharper. But is this sharpness worth the extra $2800? For me yes. That's because I'm a geek when it comes to scanners. And I do this for a living -- so I want the best scanner's out there.
But if you're just doing a home scanning project, you don't need to go all out. I want to prove to you that the hardware even from a regular $200 flatbed scanner is amazing.
What you're really paying for is the extra bells and whistles like Digital ICE.
If you want faster scans, then use / buy a scanner that has a better version of Digital ICE.
But if you care more about quality and less about speed, then get any scanner. And later I'll show you how to use image editing software to fix your scans and get better quality than Digital ICE.
Free Ebook: Tells You Secrets To Getting High Quality Slide, Negative, Photos Scans In Half The Time
Which of these scanning troubles do you want to overcome?
- What's the best resolution / DPI to scan your slides, negatives, and photos -- so you don't lose details
- Best method to digitize slides, negatives, photos using your regular flatbed or film scanner
- How to clean your negatives, slides, and photos before you scan them -- so you don't scratch them
- What side should you scan a slide or negative -- so they're not backwards or facing the wrong way
- How to setup your scanner to get higher quality digital images -- 24bit JPEG? 48bit TIFF?
- How to fix your digital images using Digital ICE, GIMP, or Photoshop and make them look new
- How to improve your scan workflow so you can double your productivity and finish your project twice as fast
- Understand the technical stuff of a digital image so you can make sideshow videos, reprints, and more!
Hey, my name is Konrad. I've been scanning professionally since 2005. I've helped multi-billion dollar companies, pro sports teams, pro photographers, artists, museums, book publishers, etc. I've scanned over 930,000 slides, negatives, photos.
The reason I'm telling you this is because no matter what challenge or frustration you're having, I know exactly what you're going through. So, to help you RIGHT NOW, I've put together a super simple scanning guide to get you started.
