How To Fix Negative Scans Using Scanning Software
In these free scan tips, you're going to learn...
- How to remove dust and scratches that ruin your negative scan
- Make the colours look more natural, and more closer to the original picture
- Save time fiddling around with Digital ICE settings
STOP: Digital ICE is convenient and easy to use. But it has limitations. So if you're serious about getting high quality scans, I recommend to NEVER use Digital ICE, and go to my Advanced Scanning Tips.
That being said, here's how to properly use Digital ICE...
Problem One: Dust, Debris, Scratches
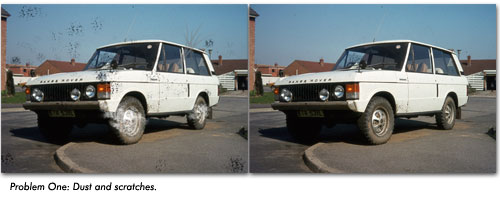
When you look close at a negative, you can't see them. But when you turn that little negative film into a 24" x 36" digital image, your scanner is going to pickup all those minute dust particles, small scratches, and other debris.
Problem Two: Grain / Noise
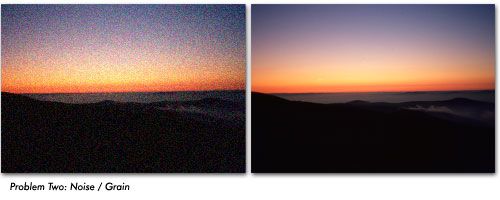
Along with minute dust and scratches, your scanner is also going to scan the actual film itself.
Take a look at a closer look at your negative. Do you see an ISO number like this?

The higher the ISO, the more grain / noise your scan will have.
Why?
Higher ISO means you can take better pictures in low light because. But if your dad used high ISO film when you were at the beach, then you'll see a lot more grain.
Problem Three: Faded Colours / Unnatural Colours
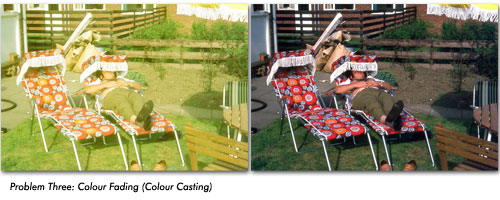
It doesn't matter if your negative film is a year old, or 50 years old. The colours on your scans are going to look faded or unnatural. This is because of "colour casting".
If you ever tried scanning, you'll notice that your images will either be too blue, red, yellow, green, etc. This is colour casting. The most dominate colour in your photo is going to take over the rest of the colours.
In the example above, yellow was the most dominate colour because the sun light. This yellow colour casting is what makes the photo look faded.
3 Easy Steps To Fix These Problems Using Digital ICE
Before you start anything, make sure you have your negatives loaded. And make sure you've clicked your Preview Button.

Then go find your "Adjustments" area. This can also be called Digital ICE, or Scan Enhancements...
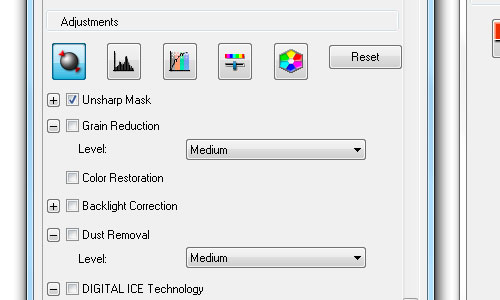
And here's how to use your Adjustments (Digital ICE, Scan Enhancements, etc.)
Step One: Repair Dust
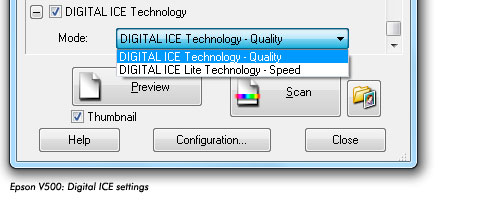
This step is very easy. Go locate your "Digital ICE" check box, and click it on. If you're scanning black and white negative, Digital ICE won't be available. But your scanner might also have a "Dust Removal" check box.
Here's what my Epson settings looks like...
And my Nikon settings...
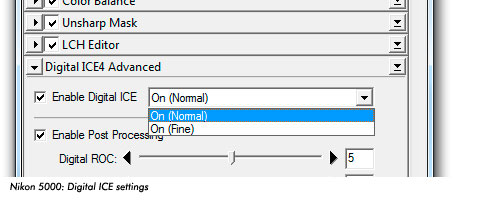
You may also see two settings for Digital ICE: quality vs. speed. Quality will do a much finer job at removing dust and scratches, but it will take longer. So do two passes, one quality and one speed. And compare the two and decide which you prefer.
Step Two: Fix Grain / Noise
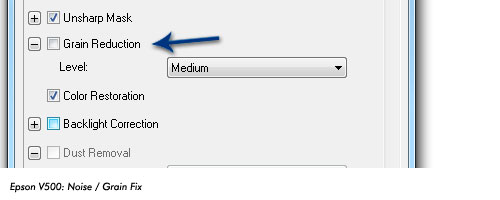
Grain sucks. And Digital ICE has a tough time fixing this. But give it a shot...
Look for Grain or Noise Reduction check box. Here's my Epson's settings...
My Nikon calls this Digital ROC and GEM...
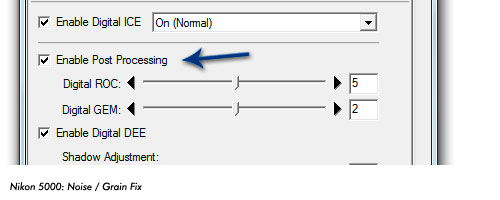
Again you'll see different level settings. Keep the Grain levels in the middle. Too much grain reduction, and your scans will look like a painting.
Step Three: Fix Colour Fading (Colour Casting)
Making your colours look natural is the BIGGEST step, and the hardest.
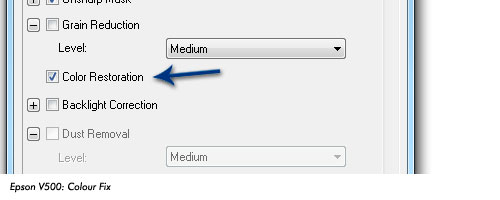
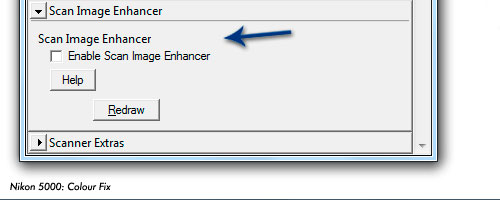
Digital ICE tries to make it easy with "auto" fixes. So look a check box called "Color Fix", "Color Restoration", "Color Balance", "Image Enhancer"
Here's what my setting's look like...
Epson colour fix...
Nikon colour fix...
What To Do Next...
Do this RIGHT NOW: Load up your scanner with just ONE negative. Follow my steps above, and hopefully you're happy with the results.
If you're happy with the results, great.
If you're not, then I highly recommend you check out my Advanced Scanning Tips. Like I said, I never use Digital ICE. It's a quick fix. If you want to learn how to use better software like GIMP, Photoshop, Lightroom to fix your scans, then jump to the Advanced Tips.
Free Ebook: Tells You Secrets To Getting High Quality Slide, Negative, Photos Scans In Half The Time
Which of these scanning troubles do you want to overcome?
- What's the best resolution / DPI to scan your slides, negatives, and photos -- so you don't lose details
- Best method to digitize slides, negatives, photos using your regular flatbed or film scanner
- How to clean your negatives, slides, and photos before you scan them -- so you don't scratch them
- What side should you scan a slide or negative -- so they're not backwards or facing the wrong way
- How to setup your scanner to get higher quality digital images -- 24bit JPEG? 48bit TIFF?
- How to fix your digital images using Digital ICE, GIMP, or Photoshop and make them look new
- How to improve your scan workflow so you can double your productivity and finish your project twice as fast
- Understand the technical stuff of a digital image so you can make sideshow videos, reprints, and more!
Hey, my name is Konrad. I've been scanning professionally since 2005. I've helped multi-billion dollar companies, pro sports teams, pro photographers, artists, museums, book publishers, etc. I've scanned over 930,000 slides, negatives, photos.
The reason I'm telling you this is because no matter what challenge or frustration you're having, I know exactly what you're going through. So, to help you RIGHT NOW, I've put together a super simple scanning guide to get you started.
